
SALT LAKE CITY RESIDENTIAL ROOF INSTALLATION PROFESSIONALS
A Reliable Salt Lake City Company for Residential Roofing Installation
When it’s time for you to get a new roof, you are probably going to feel a little bit overwhelmed. Between picking the best material, weighing the price points, and worrying about the disruption to the rest of your home, it’s a lot to handle. We get it. But don’t worry, the Rocky Mountain Exteriors team has installed hundreds of residential roofs in Salt Lake City, UT. We will walk you through the entire process and keep it stress-free.
Are you ready to learn more? Call our roofing experts today. We provide a wide range of residential roofing services, including roof installation, and replacement, as well as roof repair.
The Residential Roofing Installation Process in the Salt Lake City, UT
Trust us, installing a new roof is not something you want to DIY. You need a team of seasoned professionals that will construct your roof to last. After all, your roof is your home’s first line of defense. It protects everything you hold dear: your family, your pets, and your possessions.
Our tried and true process guarantees a smooth and efficient roof installation.
1. Free Inspection
Contact us through our online form or by phone to schedule a free inspection for your new roof. Our team of roofing specialists will help you select the colors and styles of shingles, siding, windows, and more. During this meeting, we will make sure you understand the process and answer any questions you might have.
2. Prep Work
Before the installation, we will make sure you are ready. If any preparation tasks need to be done beforehand, we will make sure you are informed. We will also fully protect the other parts of your property, like grass, shrubs, trees, and windows to keep them from damage during the installation.
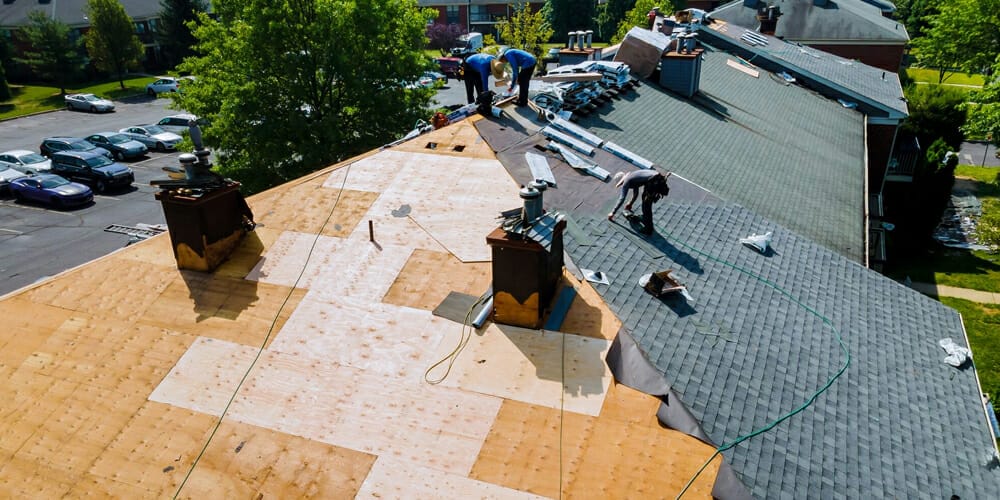
3. Roof Installation
Our team will get to work installing your new roof with the highest quality materials and best-in-class craftsmanship. You can rest assured that our team’s #1 priority is safety. We understand you have a life, so we will work as quickly and efficiently as possible to get out of your hair.
4. Clean-Up
After each day’s work, we will clean up our mess to keep your home looking tidy. We understand roof construction can be a bit of an eyesore and we want to be respectful of you and your neighbors.
5. Commitment
Our highly experienced staff is committed to providing you with unmatched customer service. When you work with us, your goal is our goal. And our commitment doesn’t end there. With our 100% satisfaction guarantee, we’ll be back to check on the project and help you with the next one on your list.
We know that roof installations can be a lot to handle. Rest assured that when you work with Rocky Mountain Exteriors, the process will be completely stress-free. We explain the steps in plain English and are committed to the utmost honesty and integrity.
You need a roofing contractor who provides quality workmanship for your residential roofing installation. Rocky Mountain Exteriors is ready to make sure your roof improvement project is done right, on time, and within budget. Call our friendly team today to get started.
Reviews
 Rocky Mountain Exteriors
3677 Utah 126 Suite R, Farr West
-
Hunter came over and knocked on my door after a good hail storm and offered a free roof inspection, we let him inspect the roof and he show us the hail damage. We made a claim though our homeowners insurance and Hunter was there when the … More adjuster showed up to help us though the process. The insurance paid for our roof and gutters and the whole thing was very fast and smooth. The replacement of the roof was clean and we were very pleased. Definitely recommend to whoever comes across Hunter! He is a stand up guy. Thanks again Hunter!
-
I had been looking at repairing or replacing my roof this summer and had been getting bids from contractors in the area, then Parker knocked on my door. Other contractors were more expensive and hard to get bids from. Parker was always … More available and easy to work with. I chose his bid on a Tuesday and the next Wednesday they were at my house getting the job done. We are on day two and they’ll be done today. Wow! It’s not a small roof. Their crew is fast, hardworking, polite, and know what they are doing. I’m grateful that Parker knocked on my door. I am so relieved to have the roof done and looking amazing. Its a worry I can now check off the list.
-
They were the only company that gave us an amazing price and quality.
Owner was on top of everything, always informing us and always available to talk. We called them on a Saturday, they started on a Tuesday and finished that afternoon. … More Other companies wanted us to wait 2 weeks and wanted double the price.
Best company ever! -
I thought it was too good to be true when Parker knocked on my door. But everything turned out just as he had explained it. I got my total roof replacement for just the deductible except for a little extra damage to the wood that was discovered … More as they worked, but he had explained to me that could happen. Parker was so helpful working with the insurance. My roof was done in half a day, including great clean up. They are a delight to work with and do great work. Definitely will recommend them to anyone.


